Deploying Aspire to Azure
My experience deploying to Azure with Aspire 13
Over the past few weeks I’ve been working on an internal sales dashboard for my employer (shoutout to Euricom!) which would show all available projects, available consultants and which consultants were being interviewed where.
It’s also my first “real” project (meaning the first one that won’t show up in my projects) to “get back in the swing of things” after my year long absence. I figured this would be a great opportunity to get my hands dirty using Microsoft’s recently released Aspire, which describes itself as:
Aspire streamlines building, running, debugging, and deploying distributed apps. Picture your app as a set of services, databases, and frontends-when they’re deployed, they all work together seamlessly, but every time you develop them they need to be individually started and connected. With Aspire, you get a unified toolchain that eliminates complex configs and makes local debugging effortless. Instantly launch and debug your entire app with a single command. Ready to deploy? Aspire lets you publish anywhere-Kubernetes, the cloud, or your own servers. It’s also fully extensible, so you can integrate your favorite tools and services with ease.1
Which is a whole lot of words for saying you “model” your application in code and Aspire handles how it runs locally as well as in the cloud. And it admittedly is pretty easy to get started (foreshadowing?), here’s a simple C# application that connects to another C# API application and a Redis cache:
var builder = DistributedApplication.CreateBuilder(args);

var cache = builder.AddRedis("cache");

var apiService = builder.AddProject<Projects.AspireApp1_ApiService>("apiservice")
    .WithHttpHealthCheck("/health");

builder.AddProject<Projects.AspireApp1_Web>("webfrontend")
    .WithExternalHttpEndpoints()
    .WithHttpHealthCheck("/health")
    .WithReference(cache)
    .WaitFor(cache)
    .WithReference(apiService)
    .WaitFor(apiService);

builder.Build().Run();
I highly recommend checking out Aspire for greenfield projects, I did see they have tooling to migrate an existing setup to Aspire but I can’t offer my insights into those yet (maybe something for a future write-up?).
However, when it was time to deploy my application to Azure is where I ran into problems. Aspire’s documentation does a great job of explaining how to deploy from your local computer.
This is how their guide tells you to go about it:
- Add deployment package (this is just
aspire add azure-appcontainers, easy) - update the AppHost (add
builder.AddAzureContainerAppEnvironment("env");to your apphost at the top)
And finally, they tell you to run aspire deploy which will give you a nice terminal interface to select which resource
group, subscription etc to use.
The problem
It’s 2025 (almost 2026 actually), we don’t run deploy commands from developer laptops anymore. We release using CI/CD, which in my case was through Github Actions. Surprisingly the documentation is extremely sparse on this subject and doesn’t really offer any guidance beyond a ticket (which I only found after most of the work described below, or this would’ve been a shorter).
AI to the rescue, after spending half a day searching for ways to do this, I cloned Aspire’s repo and had Claude Code comb through the codebase with the question
How can I deploy in a non-interactive environment like Github Actions
The answer was simple. You pass in --non-interactive and provide the needed configuration keys. Aspire (since recently)
uses .NET’s built-in IConfiguration for resolving parameters like its resource group, subscription etc. Which means
we can use appsettings.json and environment variables to configure how and where to deploy into.
So, I set up 2 environments in Github (if you haven’t used them, check them out they’re really handy!) and started adding what I needed. Before we dive into those, let’s look at the workflow file itself to see what we’re working with:
name: deploy to Azure

on:
	push:
		branches: ["main"]
	release:
		types: [published]
	workflow_dispatch:

concurrency:
	group: deploy
	cancel-in-progress: false

jobs:
	deploy:
		runs-on: ubuntu-latest
		environment: ${{ github.event_name == 'release' && 'Production' || 'Development' }}
		env:
			AZURE_CLIENT_ID: ${{ vars.AZURE_CLIENT_ID }}
			AZURE_TENANT_ID: ${{ vars.AZURE_TENANT_ID }}
			AZURE_SUBSCRIPTION_ID: ${{ vars.AZURE_SUBSCRIPTION_ID }}
			AZURE_RESOURCE_GROUP: ${{ vars.AZURE_RESOURCE_GROUP }}
			AZURE_ENV_NAME: ${{ vars.AZURE_ENV_NAME }}
			AZURE_LOCATION: ${{ vars.AZURE_LOCATION }}
		permissions:
			contents: write
			issues: read
			id-token: write

		steps:
			- name: Checkout code
			  uses: actions/checkout@v4

			- name: Setup .NET
			  uses: actions/setup-dotnet@v4
			  with:
				  global-json-file: global.json

			- name: Log in with Azure (Federated Credentials)
			  uses: azure/login@v2
			  with:
				  client-id: ${{ vars.AZURE_CLIENT_ID }}
				  tenant-id: ${{ vars.AZURE_TENANT_ID }}
				  subscription-id: ${{ vars.AZURE_SUBSCRIPTION_ID }}

			- name: Install the Aspire CLI
			  run: curl -sSL https://aspire.dev/install.sh | bash

			- name: Deploy with Aspire CLI
			  env:
				  Azure__SubscriptionId: ${{ env.AZURE_SUBSCRIPTION_ID }}
				  Azure__ResourceGroup: ${{ env.AZURE_RESOURCE_GROUP }}
				  Azure__Location: ${{ env.AZURE_LOCATION }}
				  Azure__CredentialSource: "AzureCli"
				  # example configuration for the dashboard
				  Parameters__ExampleConfig: SomeValue
				  # Custom domain configuration
				  Parameters__CustomDomain: ${{ vars.PARAMETERS_CUSTOM_DOMAIN }}
				  Parameters__CertificateName: ${{ vars.PARAMETERS_CERTIFICATE_NAME }}
			  run: |
				  $HOME/.aspire/bin/aspire deploy --include-exception-details --log-level debug --non-interactive 2>&1 | tee deploy.log
				  if grep -qi "error\|failed\|exception" deploy.log; then
				    echo "Deployment failed"
				    exit 1
				  fi
Breaking Down the Workflow
Let me walk through this step by step, because there’s actually more going on here than it might first appear.
Triggers and Concurrency
The workflow runs on three different triggers: direct pushes to main, GitHub releases, and manual dispatch. The concurrency
group ensures that only one deployment can run at a time-there’s nothing worse than two deployments stepping on each other
mid-way through. The cancel-in-progress: false means if a deployment is already running and you trigger another one, the
new one will queue up and wait instead of canceling the in-flight one.
Notice the environment selection logic: ${{ github.event_name == 'release' && 'Production' || 'Development' }}. This is
saying “if this was triggered by a release event, use the Production environment, otherwise use Development.” This is your
safety valve-releases go to Production, everything else (pushes to main, manual runs) goes to Development. GitHub will enforce
any approval rules or IP restrictions you set on these environments, which is exactly what you want.
Environment Variables Setup
env:
	AZURE_CLIENT_ID: ${{ vars.AZURE_CLIENT_ID }}
	AZURE_TENANT_ID: ${{ vars.AZURE_TENANT_ID }}
	AZURE_SUBSCRIPTION_ID: ${{ vars.AZURE_SUBSCRIPTION_ID }}
	AZURE_RESOURCE_GROUP: ${{ vars.AZURE_RESOURCE_GROUP }}
	AZURE_ENV_NAME: ${{ vars.AZURE_ENV_NAME }}
	AZURE_LOCATION: ${{ vars.AZURE_LOCATION }}
These are shared across all steps and pulled from GitHub repository variables, which you should have configured in your repo settings. The workflow will fail fast if any of these are missing, so make sure they’re all set up before you try to run this.
Permissions
permissions:
	contents: write
	issues: read
	id-token: write
The id-token: write is the critical one here-it enables OpenID Connect federation with Azure, which means you don’t need to
store actual secrets in GitHub. Instead, GitHub itself proves who it is to Azure using a cryptographically signed token.
contents: write is needed if you want the workflow to create any git artifacts (like release notes), and issues: read lets
it interact with issues if needed. This follows the principle of least privilege; you’re only asking for what you actually need.
Checkout and .NET Setup
Nothing surprising here. We check out the code and set up .NET using the version specified in your global.json. If you don’t
have a global.json, you can hardcode a version like dotnet-version: '8.0.x', but using global.json keeps your CI/CD in sync
with your local development environment.
Azure Authentication
- name: Log in with Azure (Federated Credentials)
  uses: azure/login@v2
  with:
    client-id: ${{ vars.AZURE_CLIENT_ID }}
    tenant-id: ${{ vars.AZURE_TENANT_ID }}
    subscription-id: ${{ vars.AZURE_SUBSCRIPTION_ID }}
The Azure login step uses federated credentials, which is the modern way to do this. No secrets sitting in GitHub, just a service principal that trusts GitHub’s OIDC provider. You’ll need to set this up in Azure once, but after that it’s rock solid. The action takes your client ID, tenant ID, and subscription ID and authenticates to Azure without ever storing credentials anywhere.
The way this works is by setting up an App Registration in Microsoft Entra ID, go to Certificates & Secrets and then
create a “Federated credential” like this:
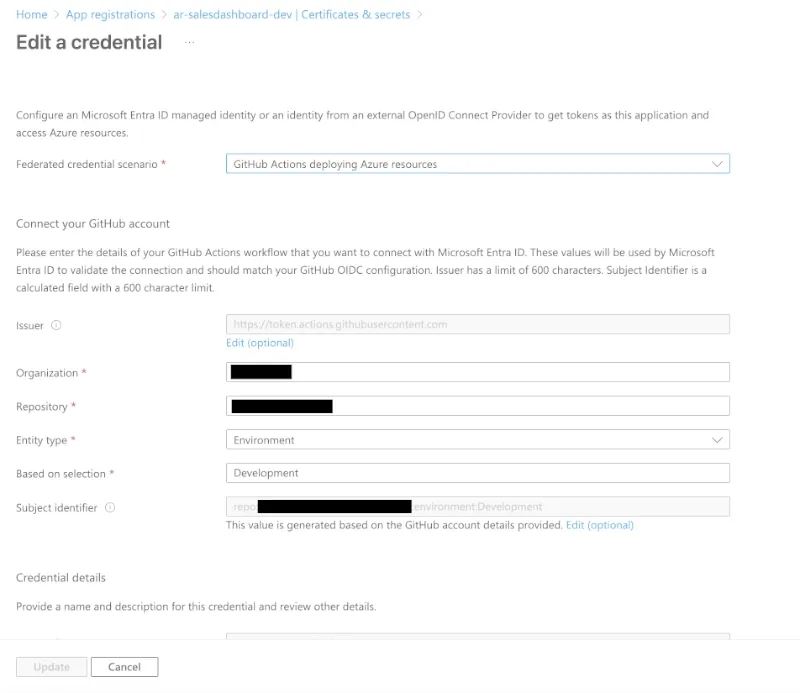
This means that the above login flow will authenticate as the app registration above, so don’t forget to set the appropriate permissions on the resource group you’re deploying to for your app registration.
Installing Aspire
- name: Install the Aspire CLI
  run: curl -sSL https://aspire.dev/install.sh | bash
Straightforward, just curl the install script and bash it. This puts the aspire CLI in $HOME/.aspire/bin/, which is where we
reference it later. One thing to note: this installs the latest version, which is usually fine but you might want to pin a
specific version if you need predictable behavior across deployments.
The Deployment Step
- name: Deploy with Aspire CLI
  env:
    Azure__SubscriptionId: ${{ env.AZURE_SUBSCRIPTION_ID }}
    Azure__ResourceGroup: ${{ env.AZURE_RESOURCE_GROUP }}
    Azure__Location: ${{ env.AZURE_LOCATION }}
    Azure__CredentialSource: "AzureCli"
    # example configuration for the dashboard
    Parameters__ExampleConfig: SomeValue
    # Custom domain configuration
    Parameters__CustomDomain: ${{ vars.PARAMETERS_CUSTOM_DOMAIN }}
    Parameters__CertificateName: ${{ vars.PARAMETERS_CERTIFICATE_NAME }}
  run: |
    $HOME/.aspire/bin/aspire deploy --include-exception-details --log-level debug --non-interactive 2>&1 | tee deploy.log
    if grep -qi "error\|failed\|exception" deploy.log; then
      echo "Deployment failed"
      exit 1
    fi
This is where it all comes together. The environment variables are crucial. Aspire reads .NET configuration from environment
variables using a specific naming convention: Azure__SubscriptionId maps to Azure:SubscriptionId in the config system. This is
why the variable names have double underscores-they’re translating to colons in the actual config hierarchy.
Azure__CredentialSource: "AzureCli" tells Aspire to use credentials from the Azure CLI, which the previous login step has already
populated. Aspire will read the token that’s already in the context and use that to authenticate to Azure.
The Parameters__ prefix is for your app-specific configuration. If your Aspire manifest defines parameters (which you’d reference
in your AppHost), you can pass them through environment variables this way. The example shows domain and certificate configuration,
which would come from your GitHub repository variables. For example, to set up the custom domain with the parameters shown above you’d do:
// Custom domain configuration
var customDomain = builder.AddParameter("CustomDomain"); // environment variable: Parameters__CustomDomain
var certificateName = builder.AddParameter("CertificateName"); // environment variable: Parameters__CertificateName

// define your services, like dashboard

dashboard.PublishAsAzureContainerApp((infra, app) =>
{
#pragma warning disable ASPIREACADOMAINS001 // Custom domains are experimental
    app.ConfigureCustomDomain(customDomain, certificateName);
#pragma warning restore ASPIREACADOMAINS001
});
Finally, the actual deploy command: aspire deploy --include-exception-details --log-level debug --non-interactive. The flags are
doing exactly what they sound like. --non-interactive is the key one-without this, Aspire will try to prompt you interactively,
which fails in CI/CD. The exception details and debug logging help when things go wrong, which they inevitably do at least once.
The 2>&1 | tee deploy.log part is a workaround for an Aspire bug where the exit code
doesn’t reliably indicate deployment success or failure. So we capture all output to a file and then grep for error keywords to determine
if the deployment actually succeeded. If the log contains any indication of failure, we exit with code 1, which makes GitHub mark the
workflow as failed. This is a bit hacky, but it’s the reliable way to handle it until Aspire’s exit codes get fixed.
GitHub Environments
You’ll need to set up two environments in your GitHub repository settings (Settings → Environments). For each one, add the variables that Aspire needs. Both Development and Production should have the same variable names-they’ll just have different values pointing to different Azure subscriptions, resource groups, etc. You can optionally add approval rules to Production so that deployments require a manual sign-off before they proceed. That’s a nice safety mechanism if your main branch gets pushed frequently.
The Payoff
Once this is all wired up, you get what modern deployment actually should be: push to main and your Development environment gets updated automatically. Cut a release and your Production environment gets updated. No manual commands, no local deploys, no “wait did I deploy the right version?” anxiety. The deployment log shows up in GitHub, complete with debug output if something goes wrong.
Is the documentation for this scattered? Absolutely. Does it require poking through GitHub issues and Aspire source code to figure out? Unfortunately yes. But once you’ve got it working, it’s surprisingly clean. Aspire handles all the infrastructure as code complexity, and you just push a button (or in this case, a git commit).
If you’re using Aspire or planning to, this should save you the half day of exploration I spent. The tooling is new enough that a lot of this isn’t well documented yet, but the foundation is solid.
Footnotes
-
Quote from Aspire’s website ↩